Documentation
Microservices API challenges
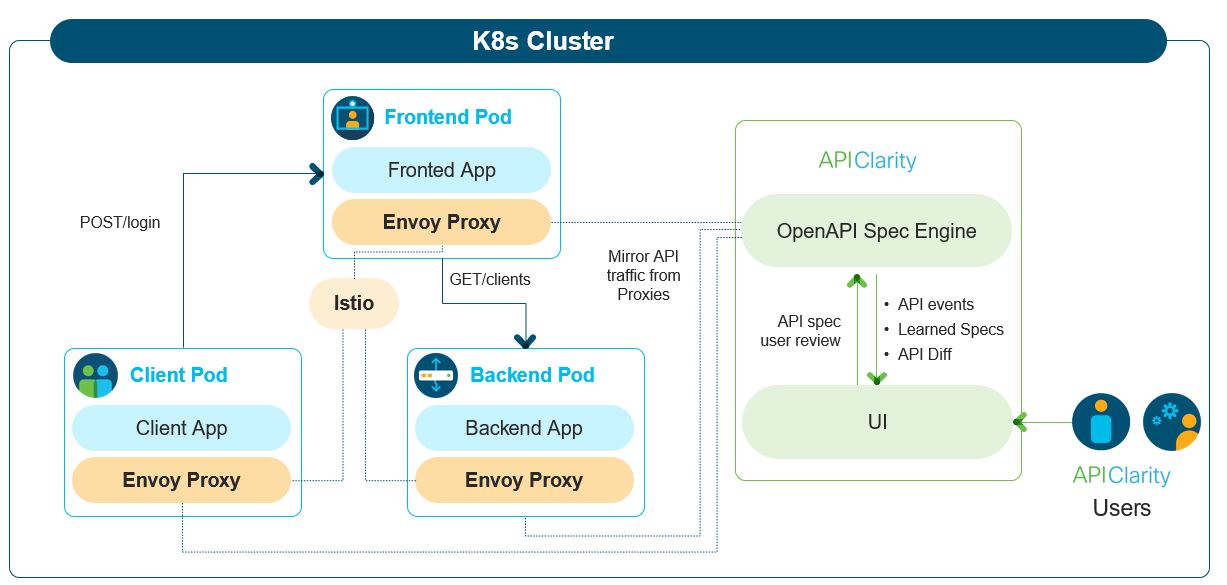
Solution
Building
Installation in a K8s cluster
APIClarity
Open source for API traffic visibility in K8s clusters
Microservices API challenges
Microservice applications interact via API’s with many other applications. To minimize risk, it is valuable to have visibility to the OpenAPI specifications and to understand any potential changes to that specification throughout the application lifecycle. However, obtaining OpenAPI specs can be challenging, particularly for external or legacy applications.
Proper OpenAPI specifications can be further complicated by microservices that use deprecated APIs (a.k.a. Zombie APIs) or microservices that use undocumented APIs (a.k.a. Shadow APIs).
Finally, it’s important to be able to obtain Open API specifications without code instrumentation or modifying existing workloads.
Solution
- Capture all API traffic in an existing environment using a service-mesh framework
- Construct the OpenAPI specification by observing the API traffic
- Allow the User to upload OpenAPI spec, review, modify and approve generated OpenAPI specs
- Alert the user on any difference between the approved API specification and the one that is observed in runtime, detects shadow & zombie APIs
- UI dashboard to audit and monitor the API findings
Building
Building UI and backend in Docker
docker build -t <your repo>/api-clarity .
docker push <your repo>/apiclarity
# Modify the image name of the apiclarity deployment in ./deployment/apiclarity.yaml
Building UI
make ui
Building Backend
make backend
Installation in a K8s cluster
- Make sure that Istio is installed and running in your cluster: (Official installation instructions).
- Deploy APIClarity in K8s (will be deployed in a new namespace named apiclarity):
- Check that APIClarity is running:
- Deploy the Envoy WASM filter for capturing the traffic:
- Run the WASM deployment script for selected namespaces to allow traffic tracing. The script will automatically:
- Deploy the WASM filter binary as a config map.
- Deploy the Istio Envoy filter to use the WASM binary.
- Patch all deployment annotations within the selected namespaces to mount the WASM binary.
- Port forward to APIClarity UI:
- Open APIClarity UI in the browser: http://localhost:9999
- Generate some traffic in the applications (e.g. sock-shop-demo) in the traced namespaces and check APIClarity UI :)
kubectl apply -f deployment/apiclarity.yaml
kubectl get pods -n apiclarity
NAMEREADYSTATUSRESTARTSAGEapiclarity-5df5fd6d98-h8v7t1/1Running215mmysql-6ffc46b7f-bggrv1/1Running015mgit submodule init wasm-filters
git submodule update wasm-filters
cd wasm-filters
./deploy.sh <namespace1> <namespace2> ...
Note: To build the WASM filter instead of using the pre-built binary, please follow the instructions on wasm-filters
kubectl port-forward -n apiclarity svc/apiclarity 9999:8080
Running locally with demo data
- Build UI & backend locally as described above:
- Copy the built site:
- Run backend and frontend locally using demo data:
- Open APIClarity UI in the browser: http://localhost:8080
make ui && make backend
cp -r ./ui/build ./site
FAKE_TRACES=true FAKE_TRACES_PATH=./backend/pkg/test/trace_files ENABLE_DB_INFO_LOGS=true ./backend/bin/backend run